
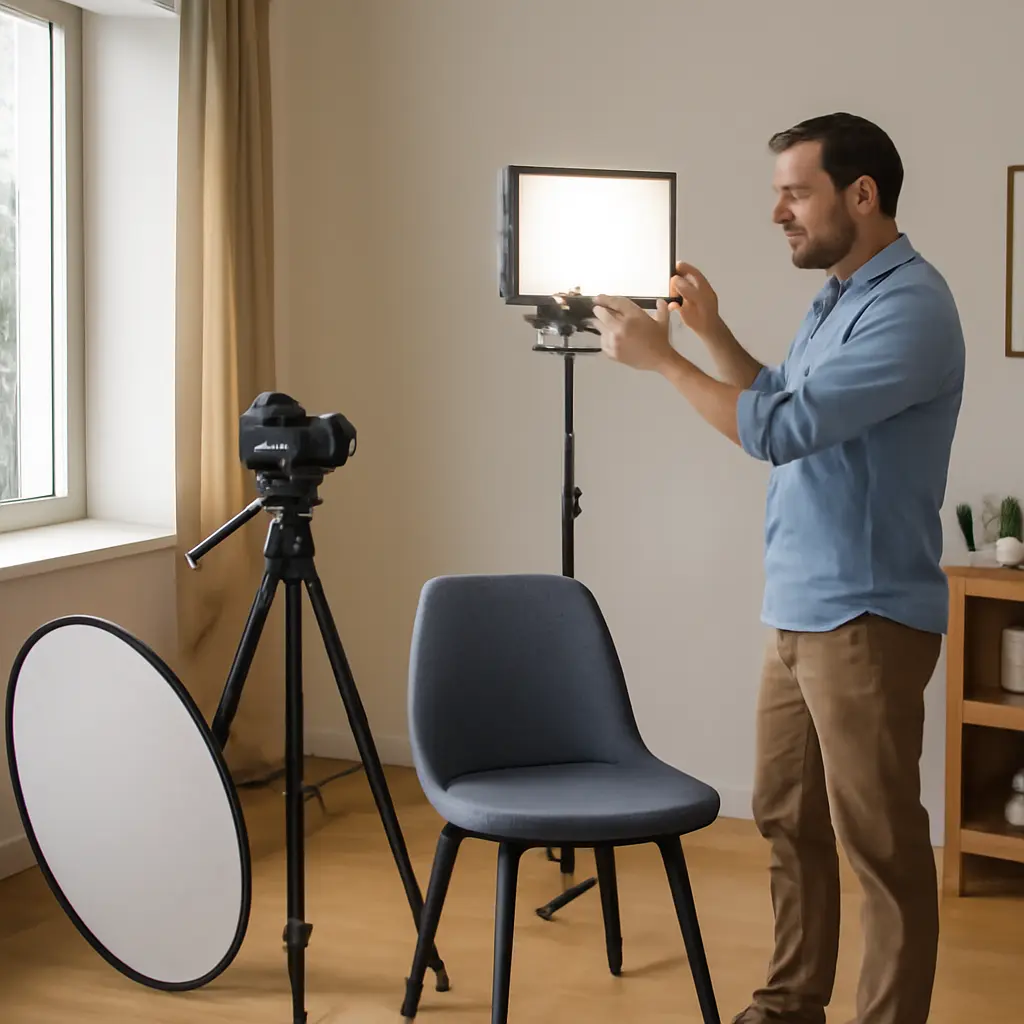
Lighting is the deliberate control of a scene’s brightness, direction, color, and contrast to make images clear and visually engaging. For amateur video, polished results usually come less from buying expensive fixtures than from shaping available light: place a soft key light near the subject, manage shadows with fill or bounce, separate the subject from the background, and keep color consistent. These principles reflect established cinematography guidance from the American Society of Cinematographers and practical recommendations from camera manufacturers. The sections below explain a simple three-point setup, affordable light sources and modifiers, exposure and color, and room-specific examples.
Lighting direction and softness shape polished amateur footage
A lighting setup is the arrangement of light sources, reflectors, and controls used to illuminate a subject and its surroundings. Cinematography texts commonly organize conventional setups around a key light, fill light, and backlight; the arrangement is a flexible starting point, not a rule that every shot needs three lamps. The American Society of Cinematographers’ educational material emphasizes that lighting choices influence a scene’s mood, depth, and visual continuity.
Two especially useful attributes are direction and softness. Direction determines where highlights and shadows fall. Softness describes how gradual the transition between them appears: a larger source relative to the subject generally creates softer shadows. That is why a bright window or a lamp bounced into a pale wall can look more flattering than a small bare bulb, even if both provide enough exposure.
Key light: establish the face and scene
The key light is the principal source illuminating the subject. For a simple interview, position it roughly 30 to 45 degrees to one side of the camera and slightly above eye level, then angle it down toward the face. A window can serve as the key; so can an LED panel softened with diffusion. The precise angle depends on the face, room, and intended mood.
A practical test is to watch the subject’s eyes and the shadow under the nose. If the face looks flat, move the key farther to the side; if the shadows become too pronounced, bring in fill or reflect light back toward the subject. B&H Photo Video’s production guides likewise recommend treating source placement and diffusion as core decisions rather than relying on brightness alone.
Fill light: control contrast without flattening the image
Fill light lifts shadows created by the key. It may come from a second fixture at lower intensity or from a reflector, white foam board, or pale wall. A reflector is often the simplest budget option because it redirects the key rather than adding another powered source.
Use only as much fill as the scene needs. Strong fill can erase facial shape, while too little may leave eyes or important details unreadable. There is no universal key-to-fill ratio: adjust by eye, preserve detail in the shadows, and check the result on the camera display. For a dramatic look, retain deeper shadows; for a clean tutorial or video call, soften them more.
Backlight and background light: create separation
A backlight, often called a rim or hair light when it catches the subject’s outline, comes from behind or behind-and-to-the-side. It can help distinguish a dark-haired subject from a dark background. Keep the source controlled so it does not shine directly into the lens or create an unwanted flare.
Background lighting is a separate choice: a lamp, practical fixture, or accent light can make the room feel layered and intentional. It need not be bright. Moving the subject a few feet away from the wall can also create separation through depth and softer background focus, without adding another fixture.
Affordable light sources and modifiers improve everyday setups
Once the roles of key, fill, and separation are clear, the next decision is how to create them with available equipment. Daylight, household lamps, entry-level LEDs, and reflectors can all work; consistency and control matter more than the label or price of a light. The U.S. Department of Energy notes that LED products use at least 75% less energy and last up to 25 times longer than incandescent lighting, although those energy comparisons do not by themselves determine a light’s color quality or suitability for video.
Window light: a large, natural key
Window light is daylight entering through a window and acting as a broad source. Place the subject near the window, turn them partly toward it, and use a white card or reflector on the opposite side to soften the shadows. A thin curtain can diffuse harsh direct sun, but avoid placing the subject in a patch of changing sunlight if the shot must remain consistent.
Daylight changes in brightness and color over time, and clouds can alter exposure during a take. For a short recording, window light may be sufficient; for repeated takes or a long interview, close blinds or supplement it with a controllable fixture so the look does not drift.
LED fixtures: adjustable, portable illumination
An LED panel or compact LED fixture provides controllable artificial light. Useful features include adjustable brightness, a stable color setting, and a way to soften or bounce the output. Check the manufacturer’s specifications and test the light on camera: low-quality or incompatible dimming can produce flicker or uneven color, particularly at certain frame rates and shutter settings.
For a basic talking-head shot, one LED can serve as the key while a reflector supplies fill. A second fixture can illuminate the background or provide a rim. This one-light-plus-reflector approach is often more effective than pointing several bare lights directly at the subject.
Diffusion and bounce: shape light instead of adding more
Diffusion spreads light across a larger apparent source, producing gentler shadow edges when placed safely between the light and subject. Bounce sends light onto a reflective surface, which then becomes the source. A white wall or foam board usually returns neutral light; a colored wall can tint it. Keep paper, cloth, and other improvised materials at a safe distance from hot fixtures, and use only materials intended for the lighting equipment.
These tools solve different problems: diffusion softens a source, while bounce redirects it and can broaden its apparent size. The right choice depends on available space and spill control. A small room with white walls may already provide useful bounce; a dark room may need a reflector or powered fill.
Exposure and color consistency keep footage natural
A pleasing arrangement can still look amateurish if exposure fluctuates or light sources disagree in color. Exposure is the brightness recorded by the camera, controlled through settings such as aperture, shutter speed, and ISO or gain. White balance tells the camera how to render neutral whites under the scene’s light. The goal is not a single prescribed setting, but a stable image that preserves facial detail and maintains consistent color from shot to shot.
Set exposure for the subject, not the brightest background
Automatic exposure may darken a face when a bright window or lamp fills much of the frame. If the camera permits it, lock exposure after framing and check that highlights on skin are not clipped and shadows retain useful detail. A histogram or zebras, when available, can help identify exposure problems; these tools complement, rather than replace, visual monitoring.
The National Institute of Standards and Technology describes flicker as temporal variation in light output. In practice, some lamps can visibly pulse or create bands on video because of their electronics and interaction with camera settings. Test each fixture at the intended frame rate, shutter speed, and dimming level before recording. If flicker appears, try a different brightness setting, power source, or fixture, and follow the camera and light manufacturer’s guidance.
Match color temperature and white balance
Color temperature, expressed in kelvins, describes whether a source appears relatively warm or cool. Daylight and household lamps can differ substantially, so mixing them may make one side of a face blue and the other orange. Choose a dominant source, turn off conflicting room lights where practical, and set a custom or fixed white balance rather than allowing it to shift during a take.
The International Commission on Illumination (CIE) provides the technical framework for colorimetry and illuminant descriptions; camera makers translate those concepts into white-balance controls. For repeatable footage, record a neutral gray or white reference under the final lighting, then verify skin tones on a calibrated or reasonably neutral display.
Room-specific lighting setups make the principles practical
The same lighting roles adapt to different locations. A useful workflow is to identify the subject, choose a key, soften or fill shadows, separate the background if needed, and then lock exposure and white balance. The examples below show how to apply that sequence without requiring a full studio.
Home interview or video call
Place the camera near eye level and position the subject facing a window or softened LED slightly off-axis. Use a white reflector on the shadow side, move the subject away from the wall, and add a modest background lamp if the room looks empty. Avoid a bright window directly behind the subject unless the camera exposure is deliberately set to preserve the face.
Product demonstration or tabletop video
For products, a broad, diffused key can reveal shape without harsh glare. Place a white card opposite the key to lift dark surfaces, and use a black card when you need a controlled dark edge on reflective objects. Move lights and cards while watching reflections: shiny packaging, glass, and metal reveal the source’s shape, so the camera may see a reflection rather than the object itself.
Small-room talking-head example
Consider a creator recording beside a desk in a small bedroom. They can use a window as the key, a sheet of white foam board as fill, and a desk lamp in the background for depth. If daylight changes during the session, a single LED panel with diffusion can replace the window as the main source. This practical arrangement uses three lighting functions but only one powered video light, illustrating why thoughtful placement often matters more than a large kit.
Conclusion: a controlled, repeatable setup looks more polished
Polished amateur footage comes from controlling light’s direction, softness, exposure, and color. A key establishes the subject, fill manages contrast, and a backlight or background accent can add separation. Window light, LEDs, diffusion, and bounce offer flexible options, while careful exposure and white-balance checks help keep results consistent. Start with one soft key and a reflector, make a short test recording, and add equipment only to solve a visible problem. For further study, consult cinematography training materials from the American Society of Cinematographers and lighting and camera guidance from reputable equipment manufacturers.
Sources: American Society of Cinematographers, The ASC Manual, https://theasc.com/; B&H Photo Video, Lighting Tips for Video and Photography, https://www.bhphotovideo.com/explora/video/tips-and-solutions; U.S. Department of Energy, LED Lighting, https://www.energy.gov/energysaver/led-lighting; National Institute of Standards and Technology, Temporal Light Artifacts (Flicker), https://www.nist.gov/programs-projects/temporal-light-artifacts-flicker; International Commission on Illumination, CIE Colorimetry, https://cie.co.at/technical-work/technical-committees.